Home › Forums › 11′ 10″ ARRIBA / OONAGH Dinghy – Official Step-by-Step Boatbuilders’ Forum › BUILDERS’ BOATHOUSE (Meet the ARRIBA/OONAGH Builders) › Building with Plans Only? – Let’s talk boats on Whidbey Island
- This topic has 45 replies, 5 voices, and was last updated 7 months, 2 weeks ago by
Tim Economu.
-
AuthorPosts
-
-
November 13, 2024 at 1:23 pm #51376
Tim Economu
ParticipantHi, I’m Tim Economu and I’d like to introduce myself. I’m an electronics engineer and first time boat builder, and I’ve built other stuff. The first house was built using the logs on our property, fallen and then skidded to the site. We hand peeled and notched those logs into a really nice house, using mostly recycled stuff, since we did not have the money for new windows, doors, cabinets, etc. The second house, I got a little smarter and hired a guy, Gordon, with a band saw mill to saw maybe 100 logs into beautiful Douglas Fir and alder and walnut, for our new passive house. I’ve also built a EV camper van from a bare steel cargo van, and that was a trip, making all the templates by hand, and using wood and aluminum for the lightweight frames and panels. So I need to work with my hands and a boat seems like a good way to do that…plus it’s fun being on the water!
About the boat, my thinking is that my wife and are more power and row people, than sailors. That means I will be building the OONAGH as a row and electric power boat, leaving out the mast, dagger board, and rudder, which brings up all kinds of questions. Questions that I hope to pose and a) answer myself in the posing of them, or b) have someone more knowledgeable (which for boating is really everyone out there) inform me and others reading this topic on the forum.
Thanks for reading along, now got to get a cup of tea and cut two more forms. The fancy plywood is on order from Edensaw in Port Townsend!
t
t
-
This topic was modified 1 year, 7 months ago by
-
This topic was modified 1 year, 7 months ago by
-
November 13, 2024 at 11:53 pm #51377Participant
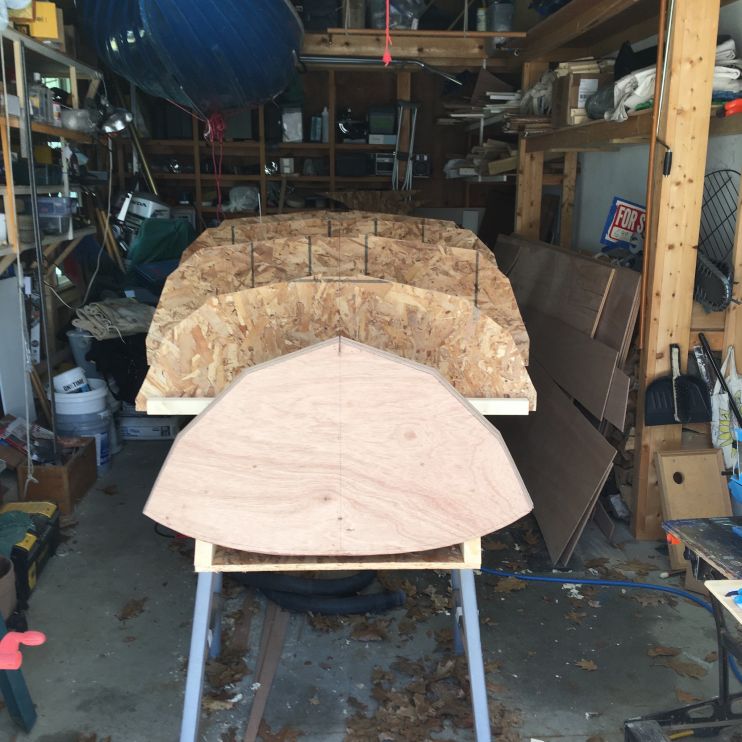
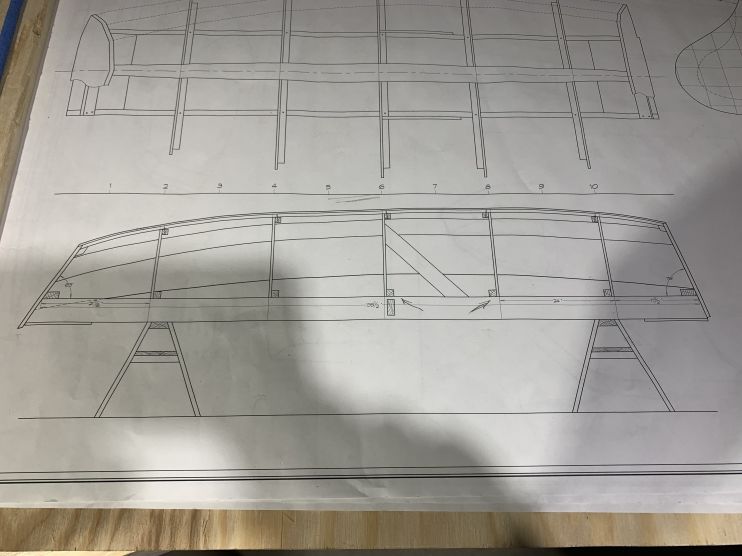
OK, I’m gonna do a list of questions that came up for me that may not be apparent with the plans and the extensive documentation that comes with said plans. Kit’s fantastic videos are the best, I’ve run them sooooo many times, and get something new every time I watch. One thing to be clear about is that she is building the kit…get it Kit is building the kit…haha. This means that you need to pay special attention to the plans page marked “Setup for Building from the Plans”, and the page of documents marked, “Construction Specifications for OONAGH”, you will see that the ladder frames are different. With the kit, you will use 2x material plus the OSB frame rails. With the plans only, you will use two 2×6’s squared and leveled for the frame rails, and the molds will rest on top of those rails.
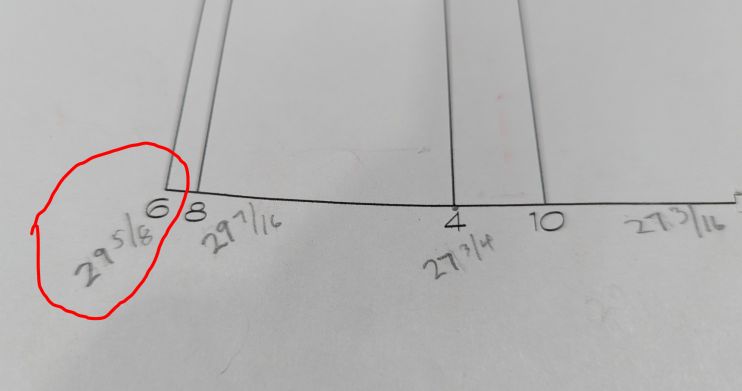
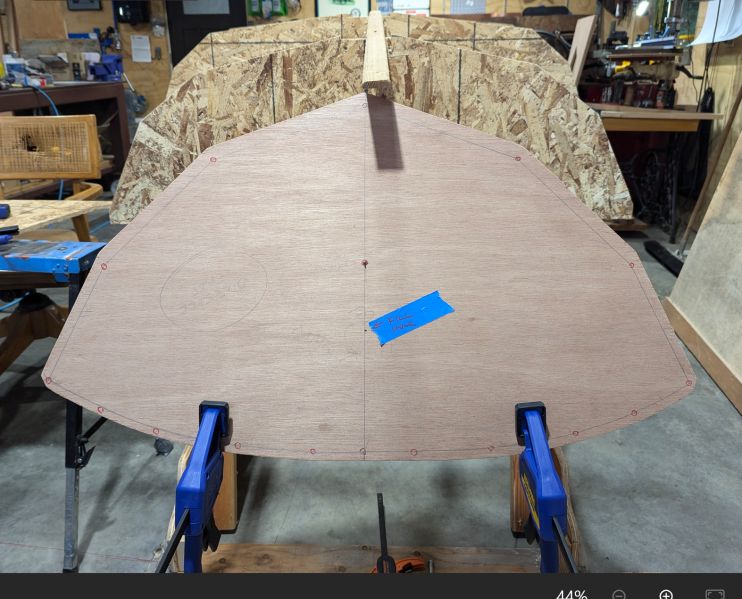
When you build the molds, you will use the “full size” mold outlines, using pins to mark the vertices of each panel. One thing you will note is that there is no ruler on the page, so you can’t verify that the outline drawing is the right size. I measured mold 6 (the widest mold) to be 29-5/8 (x2) wide, which I am hoping is close to the right size. The boat has a 60 inch beam, so I think that should be pretty close. If anyone would like to verify that number, it would be super cool.
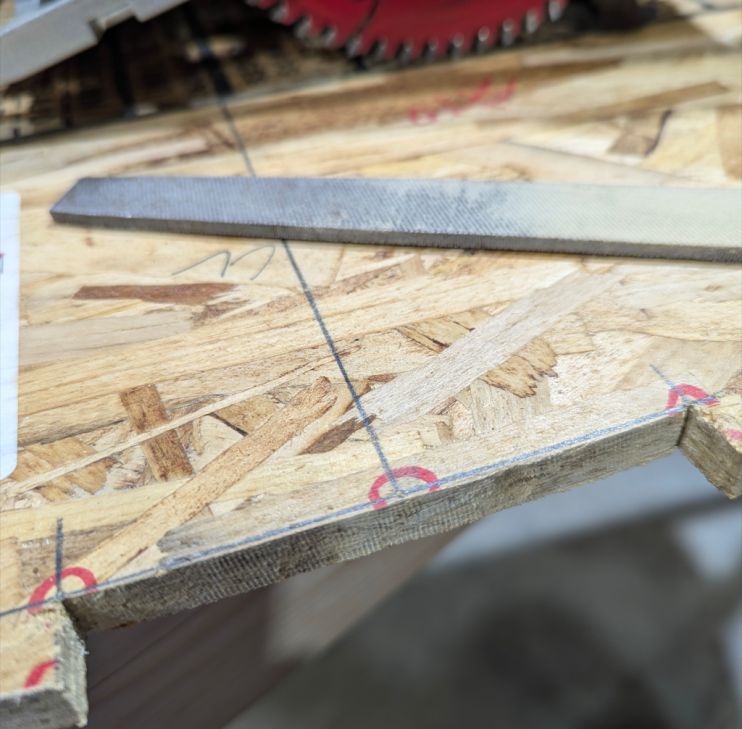
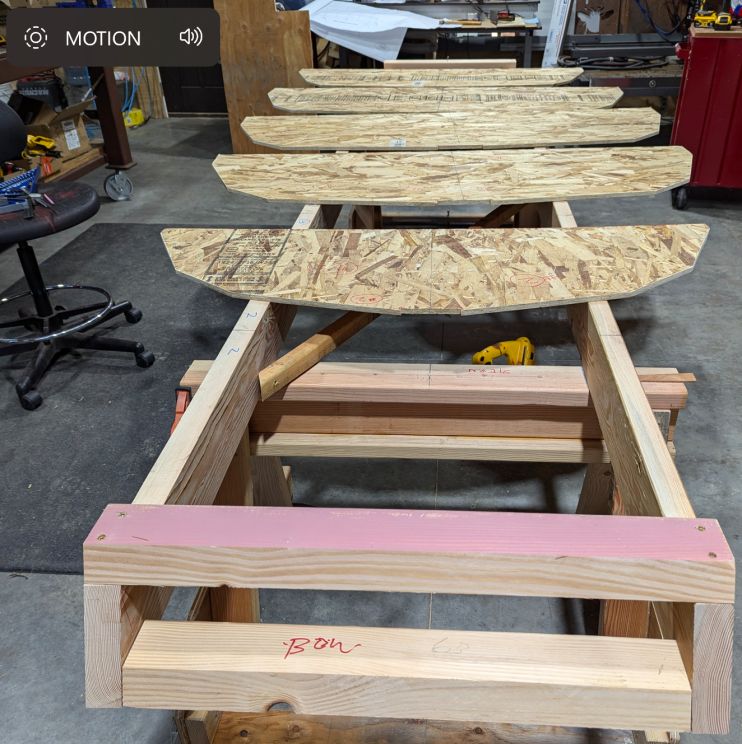
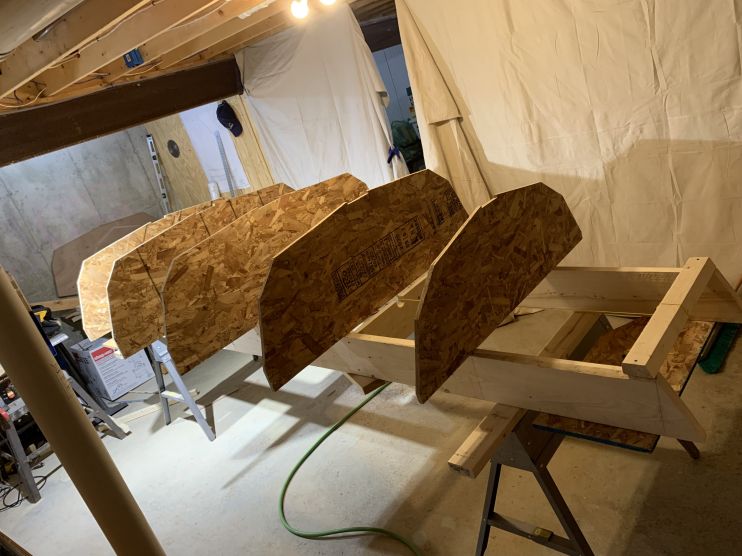
I did get the last of the five molds cut today, using the print, so they will all be proportional, and close to spec! There is a bit of filing left to do on the cutout for the keelson, to get it right on the lines.
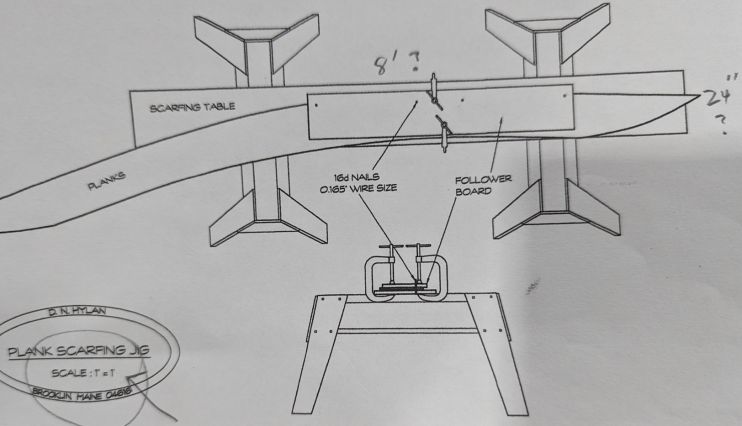
Moving on…looking at the scarfing table, my drawing shows it to be only 8 inches wide, as it’s on a small 8×10 sheet, and the scale on the drawing is 1″ =1′. But watching Kit, hers looks to be maybe 24 inches (plus or minus). Since the biggest plank is under 24 inches wide, it would be safe to go 24 or maybe 26 inches wide to allow a little extra material in the jig. Maybe Doug will see fit to add a ruler on the drawings so the scale can be verified, for those of us working on the plans only versions. Does anyone have a actual dimension they can share for the table? Many thanks if so.
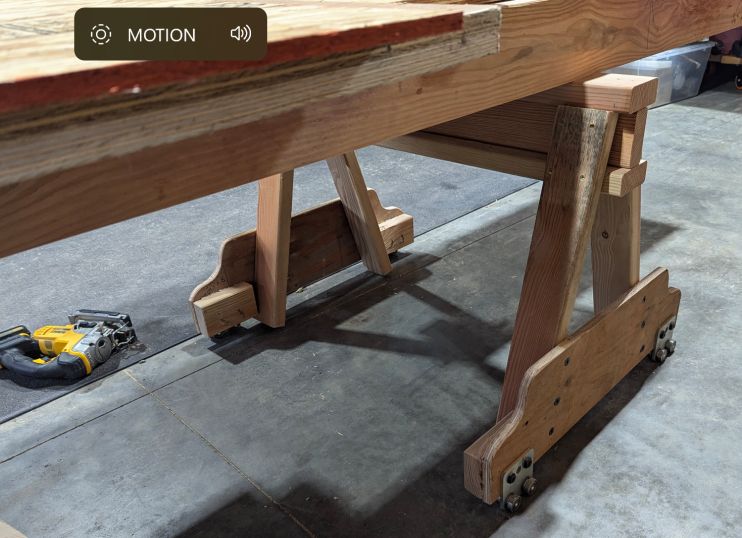
I built some rolling sawhorses to be able to move the hull outside for sanding, out through the garage door. I used unistrut trolley wheels, they roll nice on concrete or pavers, and they slide sideways easily also, which some wheels have a hard time doing.
One thing for sure, I’m having fun so far, and I can’t wait to work with the Meranti ply. Even with the challenges and inevitable mistakes I’m gonna make, it’s a learning experience and making mistakes is part of the program!
Thanks for coming along!
t
-
November 15, 2024 at 12:01 am #51440Participant
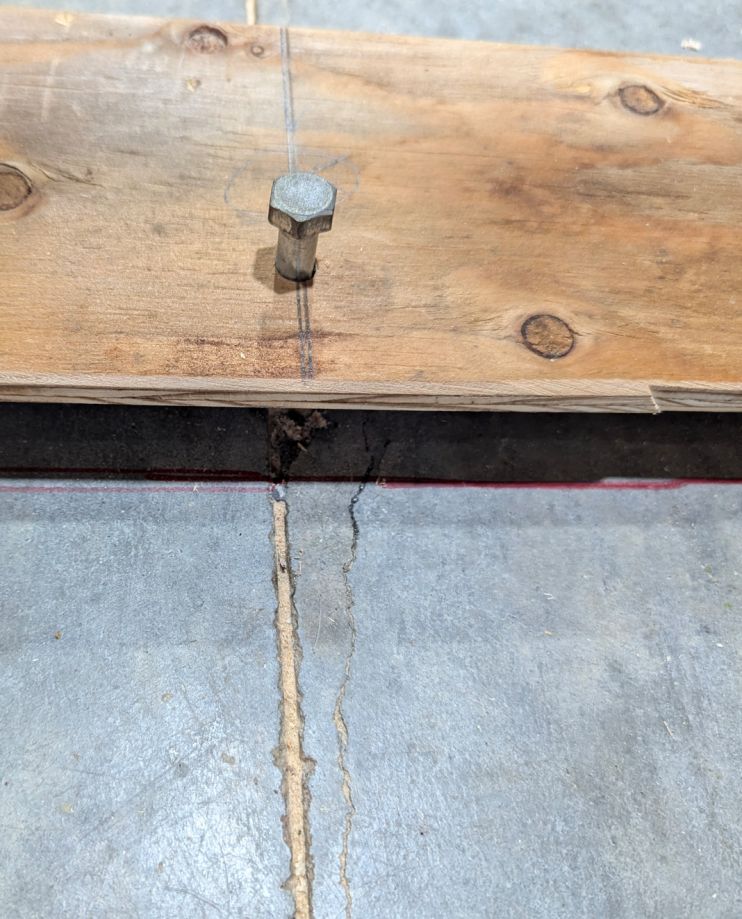
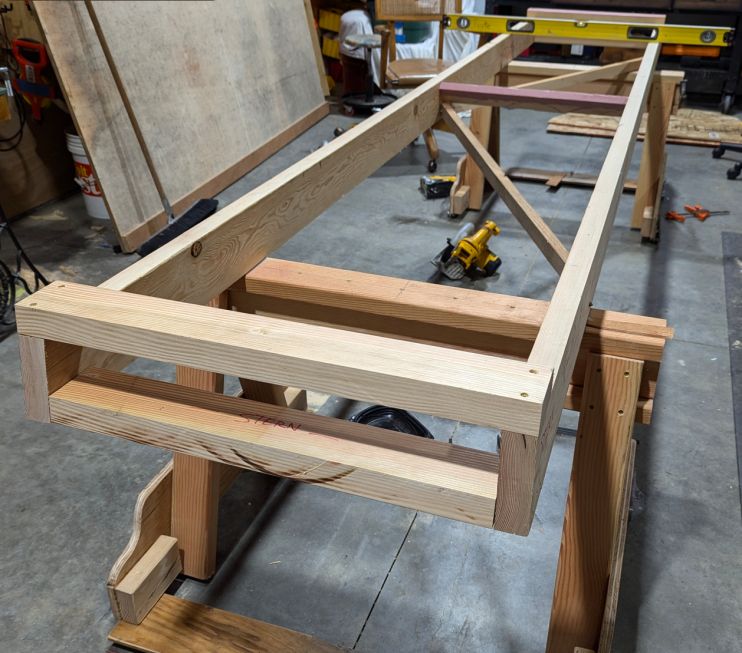
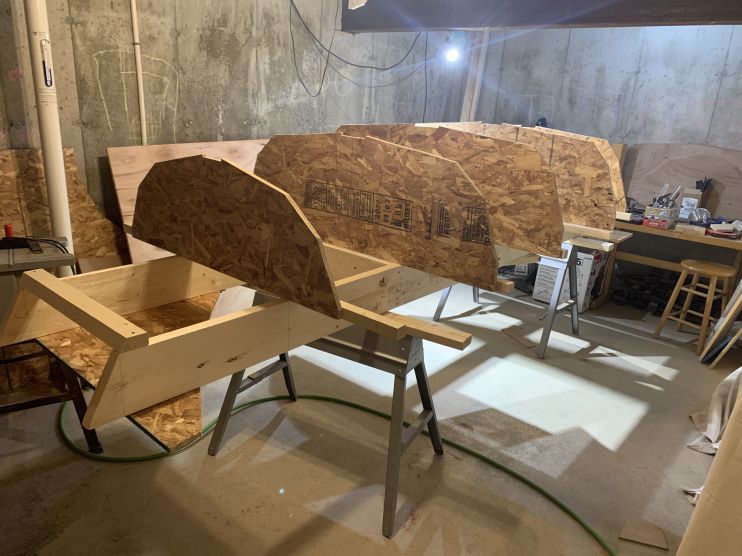
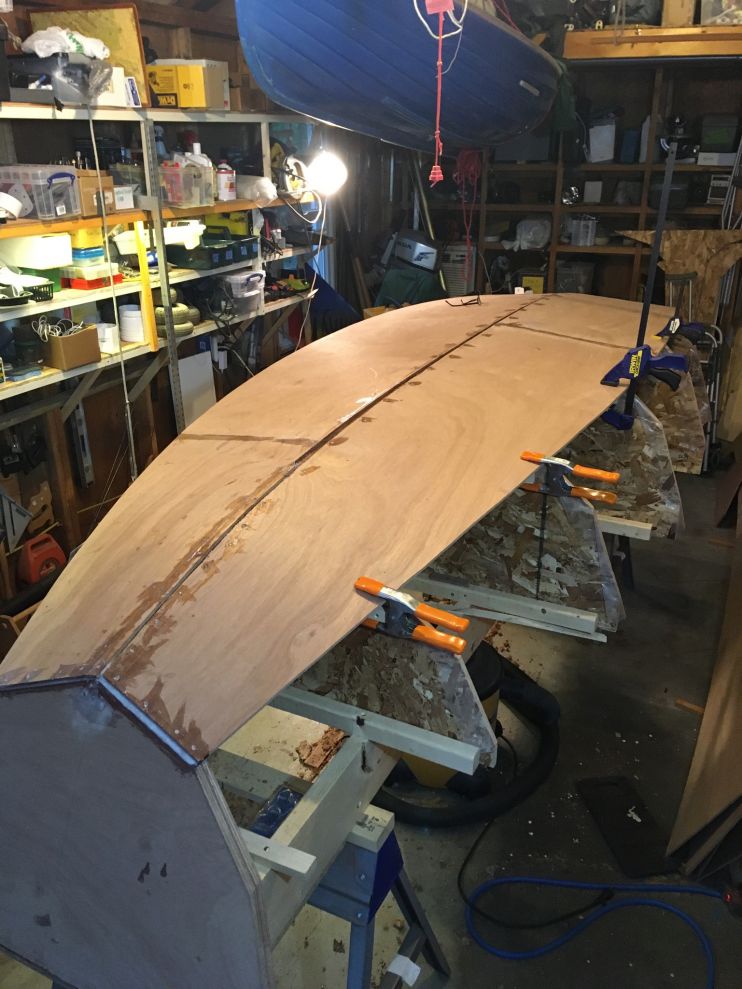
Got the ladder frame complete today, leveled from side to side. Put a string line on the centerline to align the molds. Attached a board to each sawhorse with a 3/8 in hole for using a 3/8 lag screw that lines up with a socket in the floor. Now I can roll the hull outside for sanding or whatever, and roll it back into the shop into the same position it was before. Not sure I needed that, but by dog I have it!
Next I laid out the molds to enable adding the bottom cleat……
-
November 15, 2024 at 8:03 pm #51548Participant
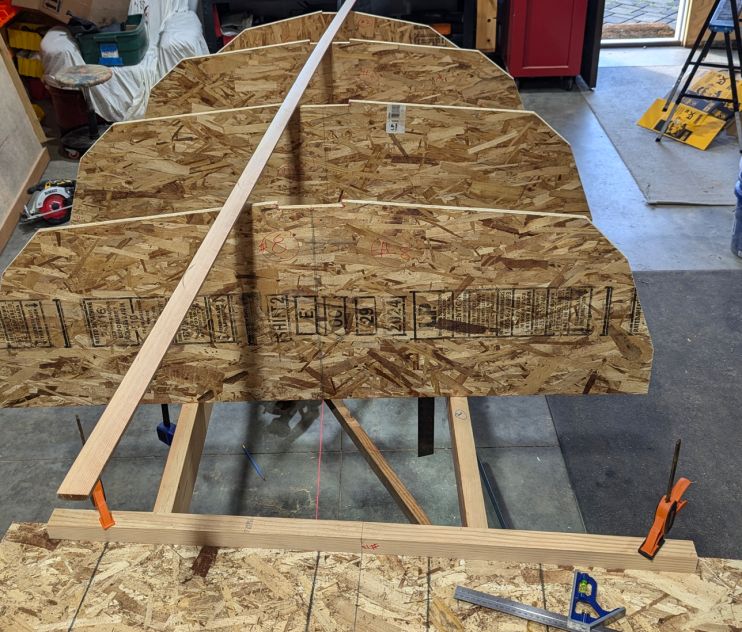
Got the ladder frame leveled on both ends and middle, then went to work on the molds. First adding the 2×2 cleats and the locating them at centerline for each station, with the cleats on the side shown on the plans.
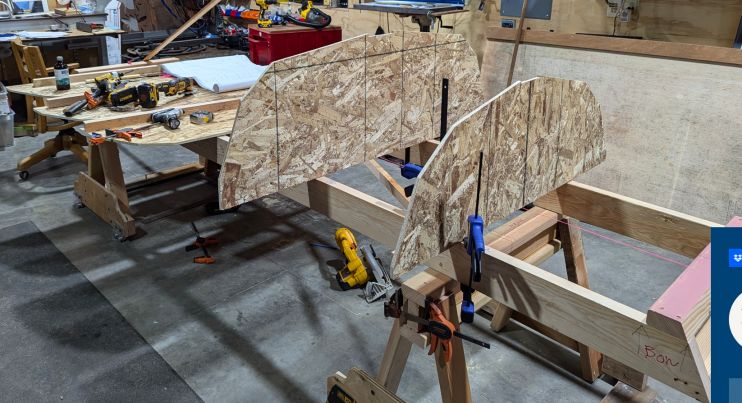
Until they were all installed with both the bottom and top cleats. The top cleat has a single screw hold for attaching the keelson.
PIC here
And there still is the scarfing jig question…if the dimension is really as shown or do I have an out of scale drawing?
But I can’t show the image because offcenterharbor.com is showing this message, even though the image is under 1M.

-
November 16, 2024 at 6:28 pm #51553Participant
-
November 18, 2024 at 11:37 pm #51569Participant
Looks like there was a lot of activity back when the kit was released, and the video series was being released to the forum. But…Since there seems to be no one the forum anymore, I’m moving the build to this address: https://boatbuild6.wordpress.com.
Hope the forum comes back to life! It could be a really good resource for builders and future builders alike…
Sadly signing off…
Tim
-
This reply was modified 1 year, 7 months ago by
-
This reply was modified 1 year, 7 months ago by
-
This reply was modified 1 year, 7 months ago by
-
This reply was modified 1 year, 7 months ago by
-
November 19, 2024 at 1:33 pm #51577
 Doug HermannParticipant
Hi Tim I was one of the original “posters”. I too wish there was more activity on this part of the site.
Earlier this year I sold my Oonagh to Steve Stone; happy to answer any questions you may have. [email protected]
I tagged your boatbuild6; it said it was coming soon.
Have fun with your build!
-
November 19, 2024 at 1:45 pm #51578Doug HermannParticipant
Hi again – I scrolled up and found more of your postings. I would say the drawings Doug Hyland to are pretty accurate – once you get the stations molds setup you can bend a batten along the length of the molds – look for gaps or something that just doesn’t look fair.
scarfing table – that’s just a suggestion – what you want is something big enough to clamp/secure the scarfed joint while the epoxy sets up. A bench top will work; I did some scarfs for a boat build on the floor and just weighted down the joint while it set up.
Hope these help Have fun!
-
November 19, 2024 at 8:42 pm #51589Participant
Hey Doug,
Thanks for the responses, really appreciate that. I have looked through all your build pages and photos and I must say you do nice work, you should be happy! About the print accuracy, I’m not questioning Doug Hyland, I’m questioning the scale coming from the printer. The print just says Full Scale, with no ruler to check the accuracy of the copy with. I’ve got 29-5/8″ for the largest mold, I’m just hoping the scale of the copy is actually 1:1 so that full scale is full scale! Other print pages are similar in have a scale noted. Adding a ruler at the bottom of each page would enable the builder to instantly check to see that 12″ = 12″ or whatever scale was set is the correct value. I have asked Offcenter to do that fix
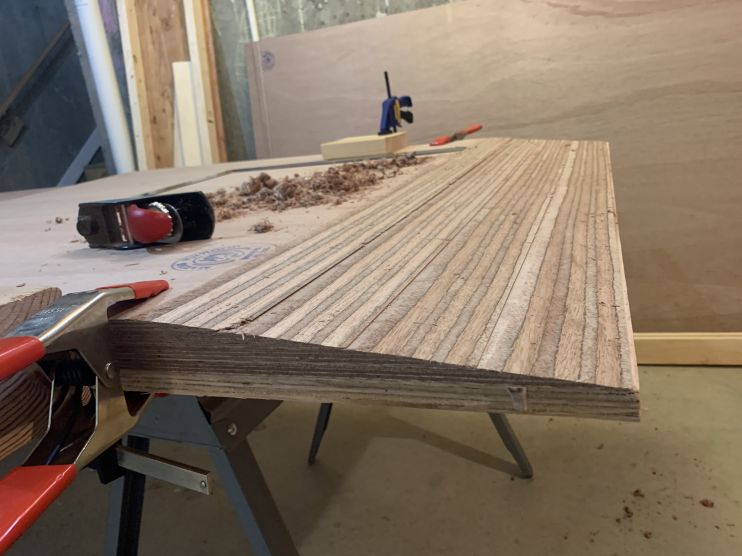
As for scarfing the 6mm and 9mm plywood, yeah most of it I can break down to get smaller pieces to scarf, and do it on the floor also. I’ve got a nice flat floor, lined with wax paper or plastic should work ok. There is one scarf that will be a sheet and a half of 9mm that will be a 4ft scarf, so I will do that one last, as I get better at it.
First I’ve got some 5/8 CDX that I can practice with, and try scarfs using the electric planer method.
Thanks again!
Tim
-
This reply was modified 1 year, 7 months ago by
-
This reply was modified 1 year, 7 months ago by
-
November 20, 2024 at 12:57 pm #51597
Ted Guild
ParticipantTim,
Reconsider the mast etc. It’s my preferred of the three means to power it.
-
November 20, 2024 at 11:53 pm #51619Participant
Ted, did you build with plans, or the kit? I’d love to see some pics of early builds with the plans only…the ladder frame is different enough that many who come later might appreciate. If by kit, would you be willing to post the pictures?
About powering with the wind…I’ll consider it but here in the PNW we don’t get a lot of summer time wind. But we do get a lot of solar. Plus I can always go back and add all that sailing stuff later. I just don’t really like putting all those additional holes in the boat…for now.
Thanks again..
Tim
-
November 21, 2024 at 7:54 am #51622Participant
We did our builds from plans and use to say those following the videos with kits: “they’re building boats, we’re building character.”
They were both built in Maine but one resides in Seattle. My friend gifted his to a couple of his nephews out there. They do some sailing in addition to rowing and motoring in the sound, lakes and have even sailed it as a drift boat fishing some river.
Definitely have photos of the process and vague recollections if there are specific things you have questions about, might be able to help.
-
November 21, 2024 at 1:00 pm #51625Participant
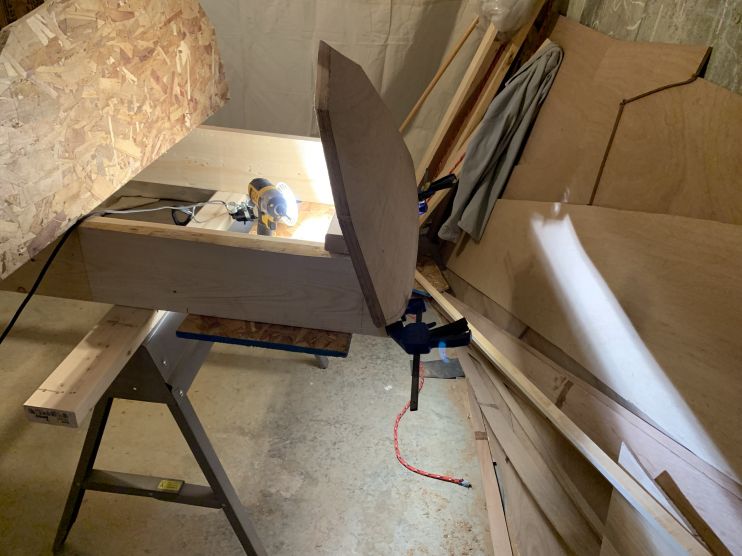
Anything you have that shows the ladder frame would be excellent. I can’t find any pictures on the site or on the interwebs that show the ladder frame as built from plans.
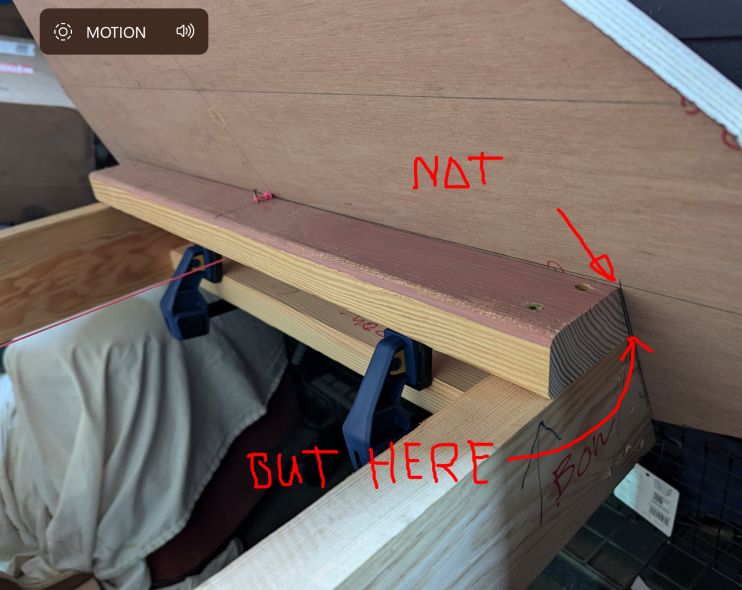
The drawings show the transoms with a line that aligns with the top of ladder frame, but the ladder frame has rails and “rungs” and after some measuring around you see that the transom lines up with the top of rail, not the rungs. Just something one has to spend some time to sus out.
Also any picture showing you measuring any parts. The kit comes with precut parts, but the plans have you build from a scale denoted on the plans, which may or may not be accurate (the print, not the design). So a picture showing a part with a tape would be help to anyone coming along later building with the plans…especially for the molds or transoms, since the boat is literally built around those parts.
t
-
November 21, 2024 at 3:20 pm #51626Participant
As it happens we’re getting together with the other builder and his wife this evening and will point him here too. I have many of his build photos in a shared photo album so will look for his ladder photos. You can tell mine because they were done in a messy basement work space and his in a crowded but organized garage.

It is important to note how one mold is on different side of marking in the middle, see arrows drawn. The kit builders had the molds provided instead of templates but still had to make their ladders so all their comments and observations should apply. We used carbon paper under the patterns for tracing the mold and transoms. After that we scratched our heads on how to do lofting for planks, came up with technique from watching YouTube videos using nails and a thin, long, straight strip of wood. We measured everything at least twice, often more.
The biggest concern for me was getting the angles correct for the transoms and attaching them.
-
November 22, 2024 at 12:04 am #51627Participant
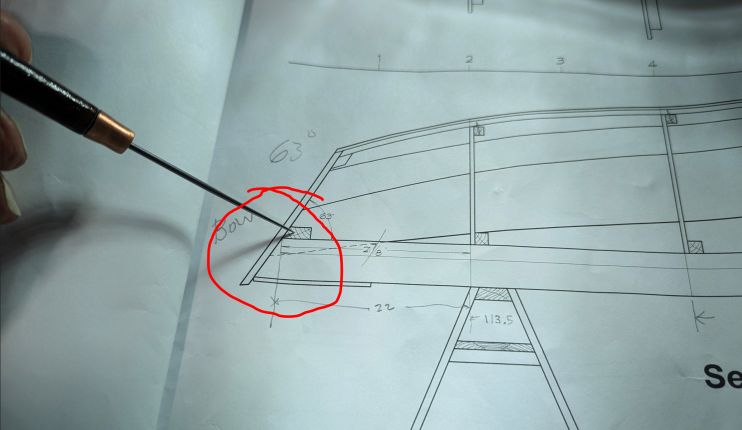
Oh boy that bow transom has me worried. I’ve put the line that aligns to the top of ladder frame, on the top of the ladder frame (not the top of the 2×4 rung) so it sits really low on the frame. Could it be that you used larger ladder frame members? I’ve used 2×6 that were squared up/shortened on the table saw, to about 5 inches high. If you used 2×8’s that might explain the differences in the transom height…

thanks for the pics Ted!
t
-
November 22, 2024 at 1:05 pm #51637Participant
Yes, those were 2×8 or maybe even 10 I had laying around, used as a ramp to load up snow blower, motorcycle or other in to the back of a truck. They’re now attached to some saw horses and serving as a work table.
One of wife’s cousins was a professional boat builder for awhile and we reached out to him with some of our concerns/hesitations. He shared what a former boss told him “you’re not making violins, get to it.”
Thickened filler epoxy is also a miracle worker.
-
November 22, 2024 at 1:17 pm #51638Participant
Just what I needed! Thanks Ted. Love the sayings very much.
I need to go scarf the keelson. First scarfing job ….ever.
t
-
November 25, 2024 at 10:22 pm #51667Participant
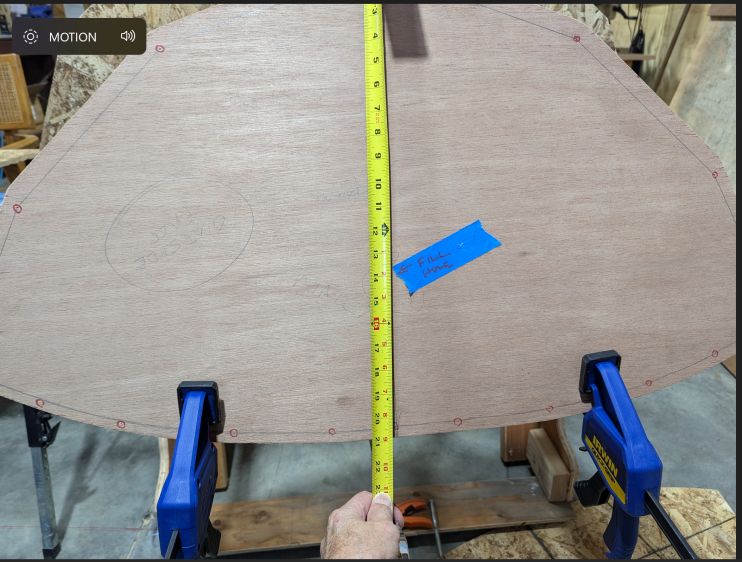
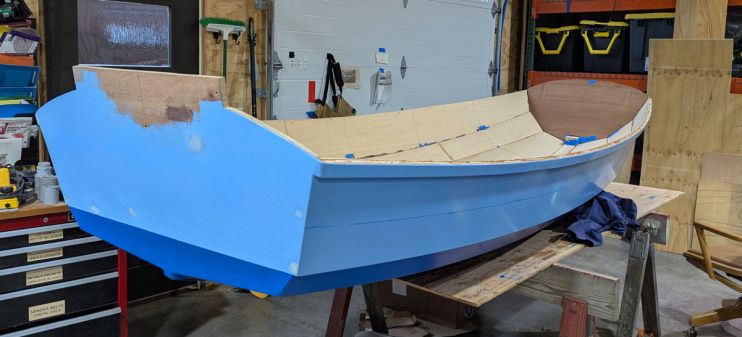
Ted (and any other plans builder out there listening) I am wondering about my next step. I’m cutting (after finishing scarfing) the chine, top and bottom panels from marine ply and I’m wondering if I need to cut them a little large, or are they already oversized and will need to be trimmed??
Since the kit already has these cut out of the plywood, the kit builders don’t have this issue. Maybe their panels are slightly oversized already?
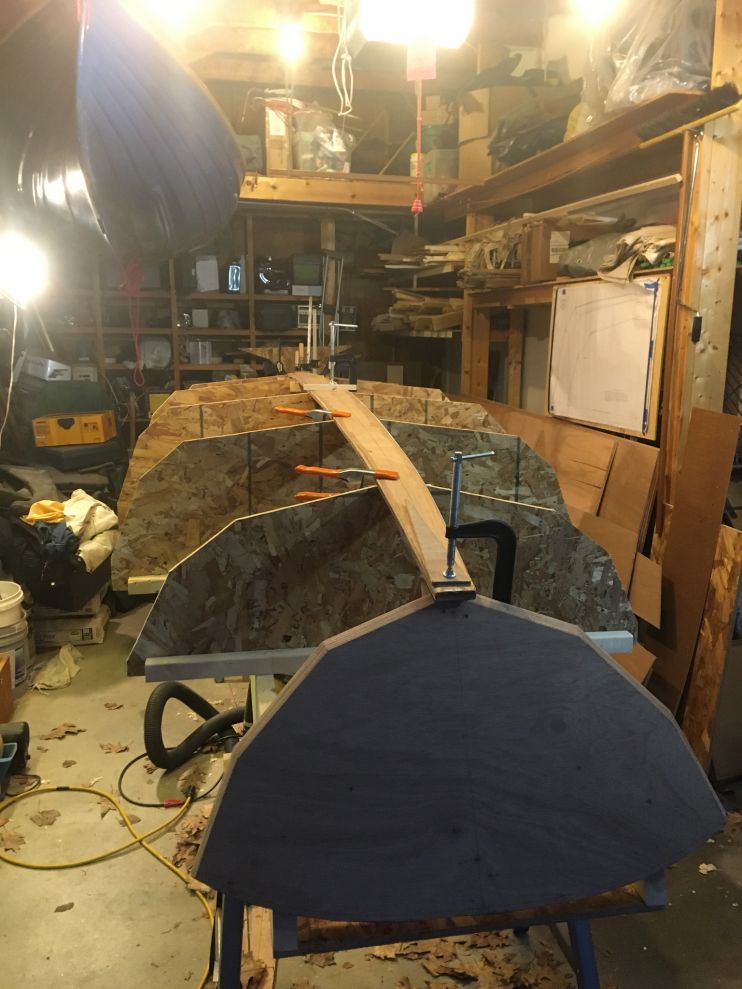
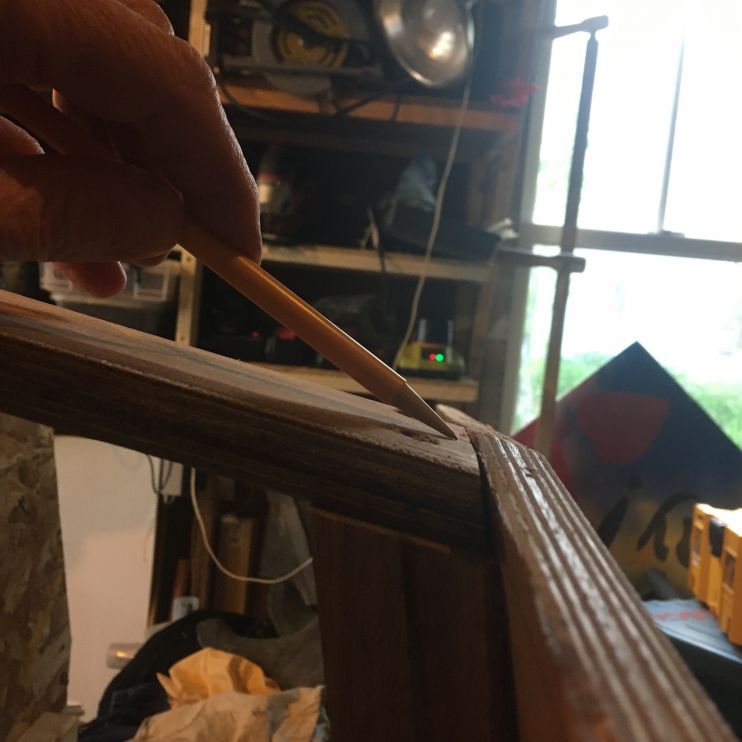
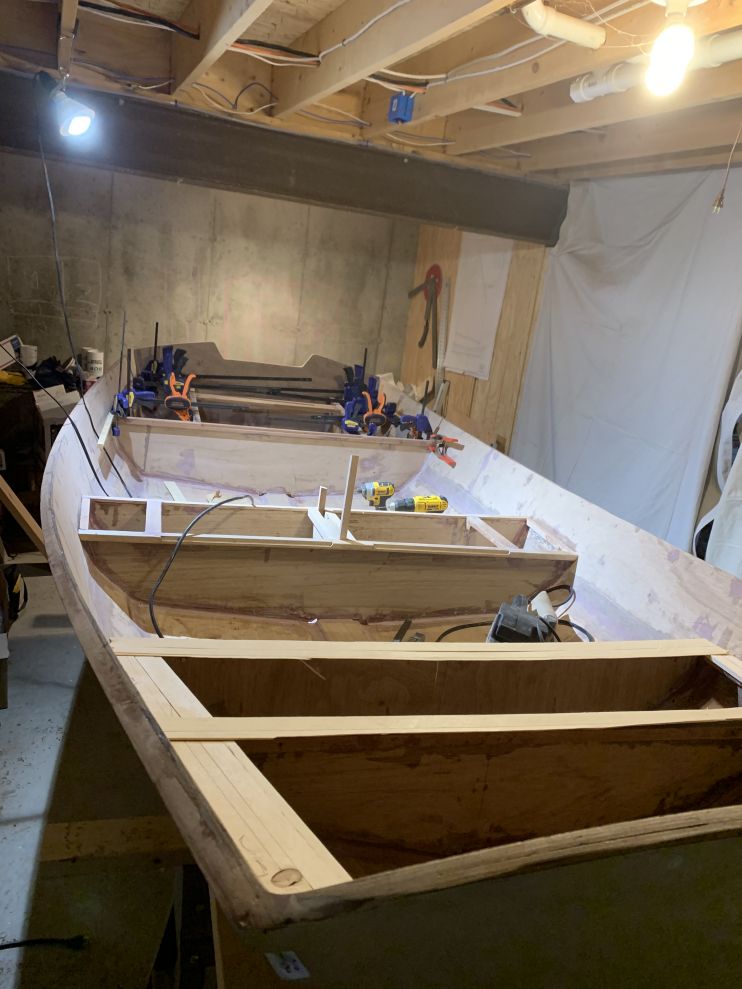
OK, got the keelson pieces glued up and the epoxy is almost cured, so next up is shaping and attaching the little cleats that hold the keelson to the transoms.
t
-
This reply was modified 1 year, 7 months ago by
-
This reply was modified 1 year, 7 months ago by
-
November 26, 2024 at 12:33 pm #51671Participant
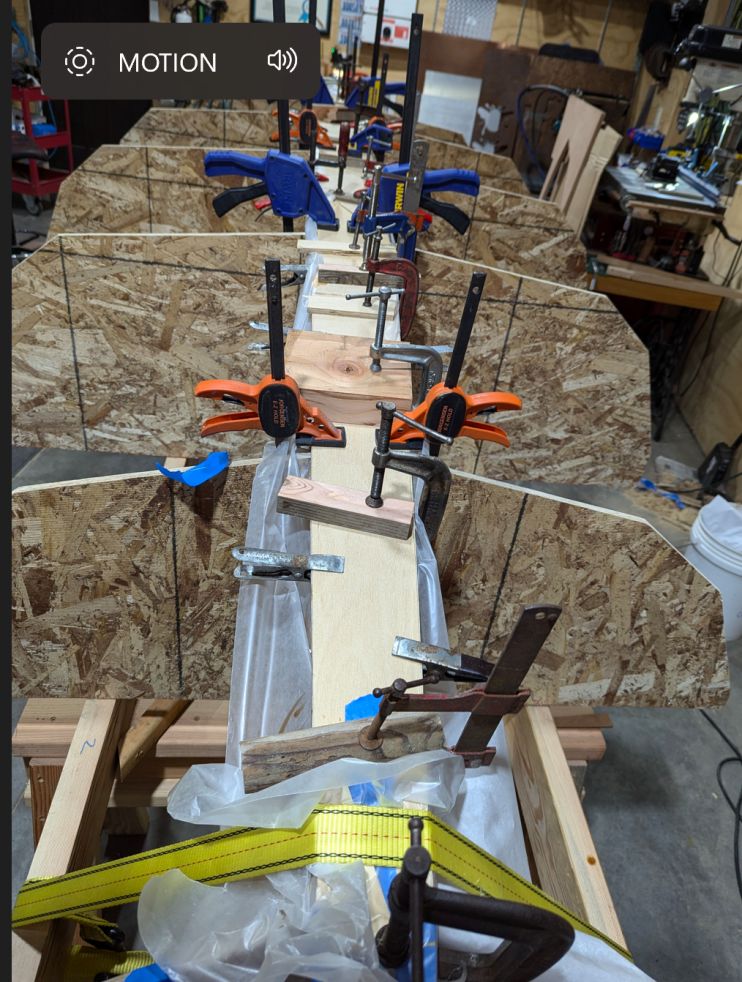
Another plans question, how in the heck did you manage to scarf those 4×8 plywood panels to get your 140 inches long planks? My goodness!! I’ve been able to break up the keel panel boards into two smaller pieces, and I did build a jig for scarfing 4×8 panels…but but but they are SOOOOO big and cumbersome! I hear myself saying “if I’d only ordered the kit…”
OK…back to scarfing..
t
-
November 26, 2024 at 12:55 pm #51673Participant
Powering question for those with outboards on their Arriba.
What is the highest power you have tried on the boat? I’m planning on electric drive, somewhere from 1-3 kw, and I’m wondering if anyone has dared try a 5hp on this boat? One of my choices is a 5kw unit, which is way overkill, but it’s peak efficiency is in the 3kw range, or easily 5hp “petrol equivalent”. The next power step down is about 1.2kw or about 2hp, which would probably be fine…but that is full power which is never the best situation for any motor really.
t
-
November 26, 2024 at 2:27 pm #51718Participant
Hi Tim,
We cut the planks according to the plans. I measured every plotted point at least three times on the 12×4 (actually 11 something due to scarfing loss). Basically that should get you planks close to the kit, which is just CNC of the plans. Most planks lined up very well with the transom outer edges. I had one probably about 1/8” too long and Ben had one maybe less than an 1/8” too short. Remember what I said about the magic of thickened filler epoxy? The transoms are 3/4” before you plane the angles on the ends, after you probably have a good inch of surface space for the epoxy and screws to attach planks to so don’t fret, but do double or triple check your measurements.
There were times we wished we went with the kit. Definitely a bit more pride and sense of accomplishment going from plans though.
I had my keelsom epoxied before attaching to the frame but your technique should be fine.
Ben had a scarfing jig for a circular saw he put a finer blade on. Steady hands and a guide helped. We then took the pieces and stacked up, hand planing to try to get angle consistent. We built a temporary frame to hold in place while epoxy cured with ample weights on the seams.
Plastic sheeting helps keep epoxy from adhering to things you don’t want it to.
Skeptical millennial not included.
-
November 26, 2024 at 2:33 pm #51719Participant
Somewhere, either Doug’s intro video on his design, in the notes that came with the plan or maybe Kit in her tutorials said anything more than 5hp is wasted on this hull design. I forget what my Epropulsion one is but that ballpark +-. It can move it around fine and know a larger sail boat that uses the same when not wind powered. You won’t win any races.
-
November 26, 2024 at 2:47 pm #51726Participant
Ben was farther along and we roughed out the spars before I needed to make the interior pieces. For those you need to make your own templates, one or two pieces you may be able to use your mold as a reference.
All the long spruce scraps came in handy making my templates. Measure out the different sides, glue together and then lay on top of plywood and trace.
Here’s one for the bow platform.
I know you’re not there yet but sharing early since I probably won’t renew my OCH membership again this next year. This was a head scratcher moment going from plans instead of kit.
I’m inconsistent in checking email but mine is my first@last name with s.net after last, should you have any questions after the new year.
-
November 26, 2024 at 11:43 pm #51728Participant
Ted thank you so much!
Talking about head scratching…you just saved me a bunch! Those scarf’s look really nice, and on top of that you showed the glue-up jig you used. When I took delivery of the fancy plywood, the lumber yard added a top and bottom layer of 1/2″ CDX, that I now definitely will use to copy your jig. Thank you so much!
Thanks for the contact info too!
tim
-
December 2, 2024 at 12:43 am #51740Participant
Hi Ted,
What’s your top speed with the Epropulsion outboard? I’m assuming you have the Spirit 1.0 (1hp)?
That looks like a pretty nice motor, and it can take an external battery, which is nice for extended running.
t
-
December 2, 2024 at 12:48 am #51741Participant
Oh and related to the motor question, what transom height and motor length did you go with?
Thanks again!
t
-
December 3, 2024 at 12:38 pm #51743Participant
“I know you’re not there yet but sharing early since I probably won’t renew my OCH membership again this next year.”
Yeah, sadly this is a big problem with a boat building forum that boat builders can’t access without a paywall…OK I will try to access you via private conversation, which won’t benefit anyone else down the road. How about Off Center open the forum to the rest of the world for free, while still charging for access to the huge video library?
t
-
This reply was modified 1 year, 7 months ago by
-
This reply was modified 1 year, 7 months ago by
-
December 8, 2024 at 11:35 am #51771Doug HermannParticipant
Hi Tim – regarding your post: What is the highest power you have tried on the boat? I’m planning on electric drive, somewhere from 1-3 kw, and I’m wondering if anyone has dared try a 5hp on this boat? One of my choices is a 5kw unit, which is way overkill, but it’s peak efficiency is in the 3kw range, or easily 5hp “petrol equivalent”. The next power step down is about 1.2kw or about 2hp, which would probably be fine…but that is full power which is never the best situation for any motor really.
I recall Doug Hylan addressing that in one of the videos on the build of the boat – best I remember was max 2hp – anything more is a waste and you won’t necessarily go any faster.
-
December 8, 2024 at 7:16 pm #51778Participant
Yep I read that also in the intro to the plans, which implies (and looks to me to be) a displacement hull, with the top speed limited to hull speed. But a curious person might have actually tried the boat with more power. My boat won’t have the drag of the daggerboard and rudder, so I’m wondering what that curious person may have found when they put more power on the transom. I’ve got a 8hp electric motor, so looks like I might be the first to find out. I will make sure to reinforce the transom, to handle the higher power. The motor is most efficient in the 2-4hp range, but we will see what happens at full power too!
t
-
This reply was modified 1 year, 6 months ago by
-
This reply was modified 1 year, 6 months ago by
-
This reply was modified 1 year, 6 months ago by
-
December 28, 2024 at 5:56 pm #52016Participant
Hey Tim,
I’m not sure my top speed. I have done 3 nautical miles in sub thirty minutes with motor, sail and tide, so six knots. I almost never put the throttle over 3/4 and the wind+motor combination has been appreciated when either independently wouldn’t have been enough to power through, fighting the tide to get out of a bay for instance.
It is not meant for strong winds but have found a longer (mine about 4’ total and definitely overkill) dagger board nice to have when conditions warrant and you’re stuck making way back, gives you a bit more flexibility before reefing and more stability when gusty overall.
Looking forward to seeing pictures your build Tim. Feel free to reach out by email if you have any questions.
Happy Holidays to OCF staff and community. Your content has been appreciated, extremely informative.
-
January 8, 2025 at 8:59 pm #52065
Graeme Jefferies
ParticipantHi Tim
just noticed your posts I am also building Oonagh from plans. I started 9 November so looks like a similar time to you I am also a 1st time boat builder I have found the plans to be excellent and so far I haven’t had any issues. I am almost ready to turn her over. I’m looking forward to the next stage
-
January 8, 2025 at 9:00 pm #52066Participant
Hi Tim
I forgot to mention that I live in New Zealand
-
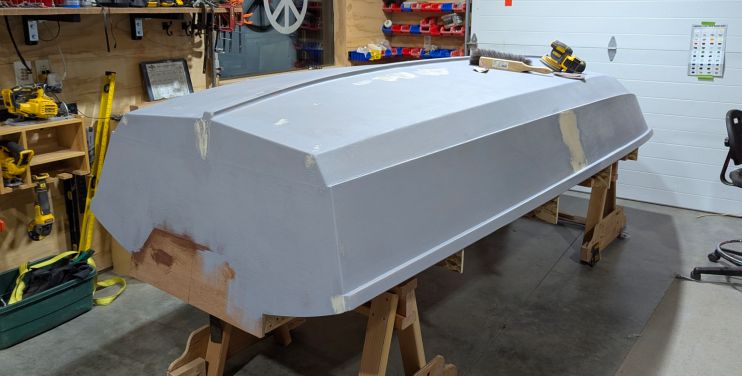
February 1, 2025 at 2:04 pm #52176Participant
Hi Graeme, where in En Zed? We had a lovely time on your islands a few years back!
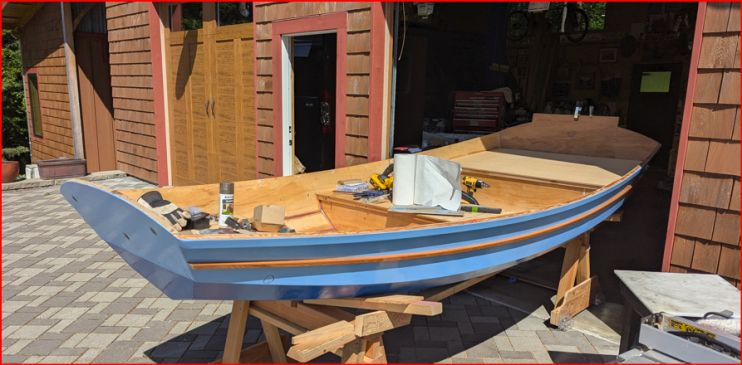
So I’m flipping soon also, here’s a pick of primer and one finish coat. Let’s have a pic of your boat too ok?
t
-
February 2, 2025 at 1:05 pm #52178Participant
-
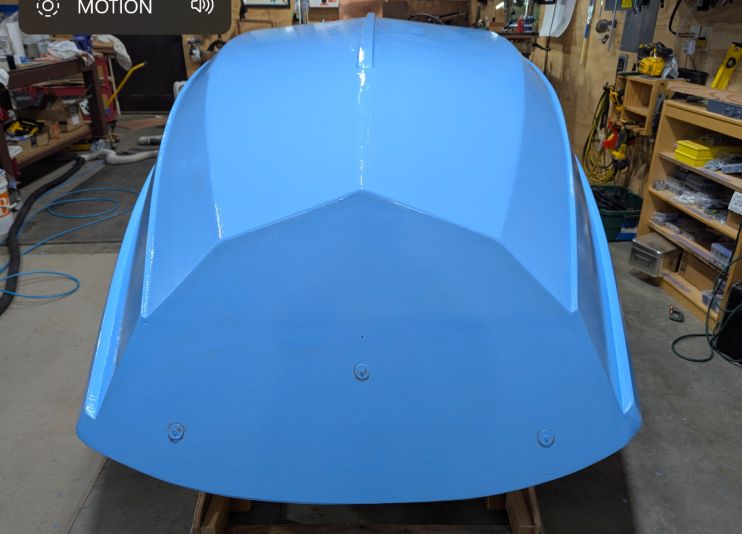
February 9, 2025 at 1:51 am #52195Participant
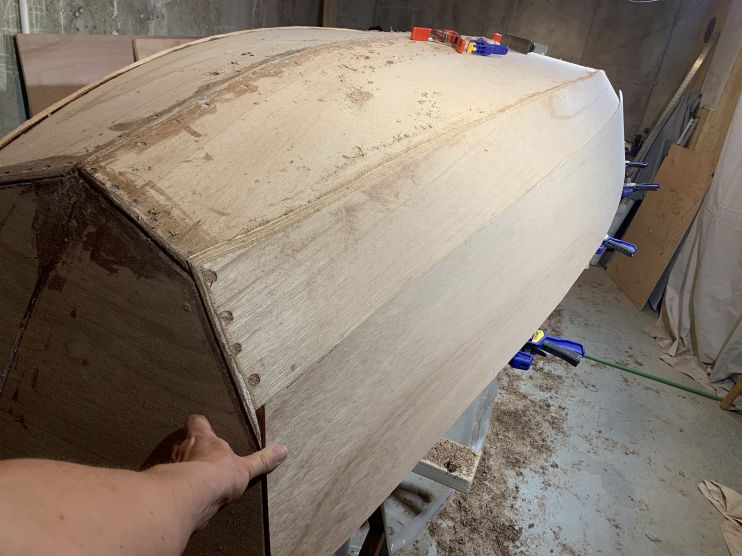
And its flipped!
-
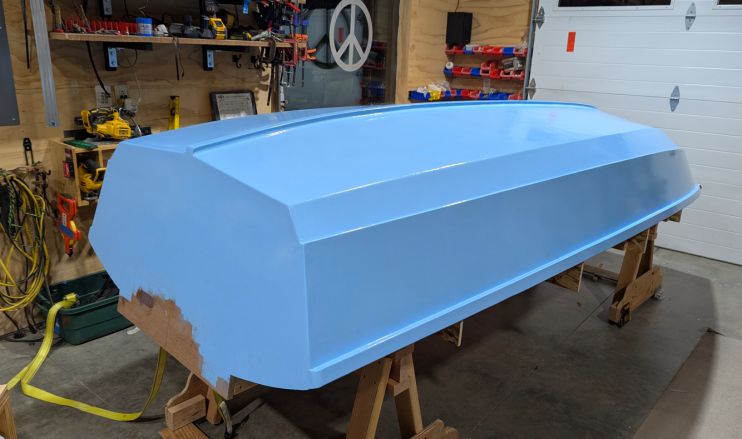
February 27, 2025 at 8:21 pm #52336Doug HermannParticipant
Tim – The build is looking good! Nice work!
-
February 27, 2025 at 11:02 pm #52339Participant
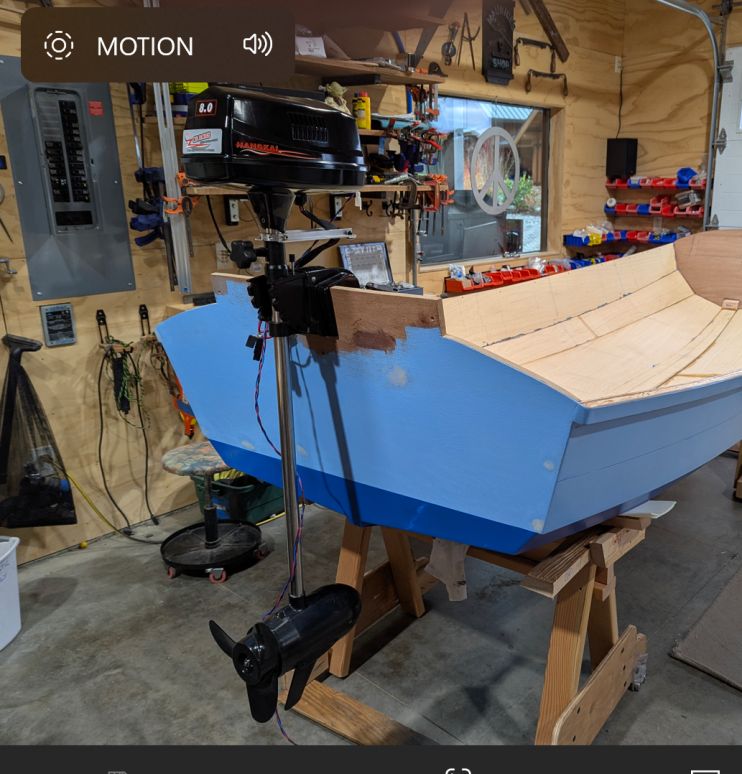
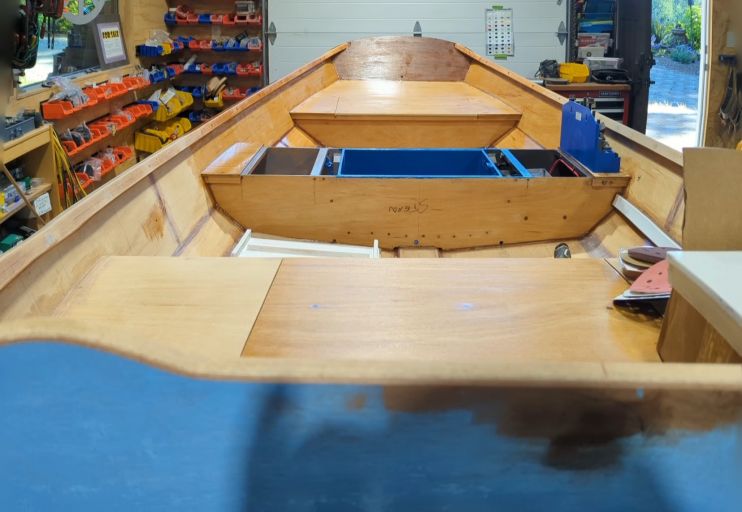
Thanks Doug, just got the battery box done today, now needs to be glued into the boat! The pack will be 48VDC, so 14 ea 3.6V, 300ah, EVE cells, for a total of 15kWh pack. Also tried on the 2.2kW motor (3hp continuous). Run time at full power is 6 hours…
-
June 19, 2025 at 11:58 am #53155
Joe Cangeleri
ParticipantGreetings All,
Joe Cangeleri here. Considering building from plans and been giving them a good hard look. I have drawing, drafting, lay-out and woodworking experience including helping to build a small skiff (but not start to finish). One thing that seems glaringly missing is the lay-out for bulkheads. The one at station 6 can be worked out, the other 4 are missing in action. Love Doug Hylan’s designs but don’t understand why bulkhead lay-outs were not included. Any insight from other plan builders would be appreciated. Thanks, Joe.
631 834 3461 [email protected]. Ronkonkoma, NY
-
June 23, 2025 at 12:33 am #53162Participant
Hi Joe,
I spent quite a bit of time on them, and you are right, they could easily have been given in full size like the transom prints, but alas you have to
scale them from the drawings.
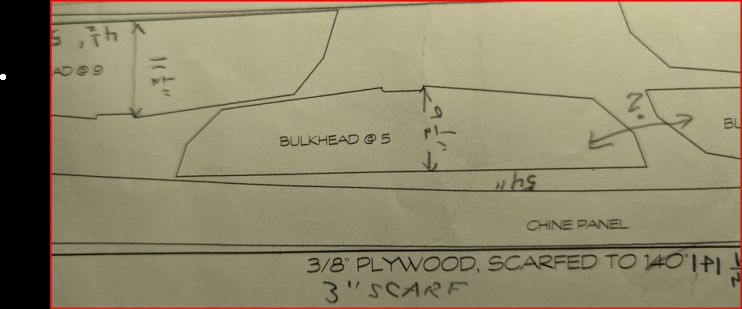
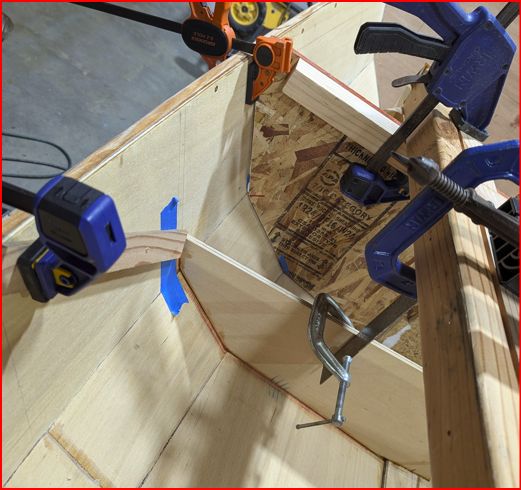
What I did was I took a picture of them, then imported the picture and scaled in cad. Then I could print sections out in 1:1 size to lay onto the material to cut sample bulkheads. I used 1/2 foam left over from a building project, it was easy and fast to cut.
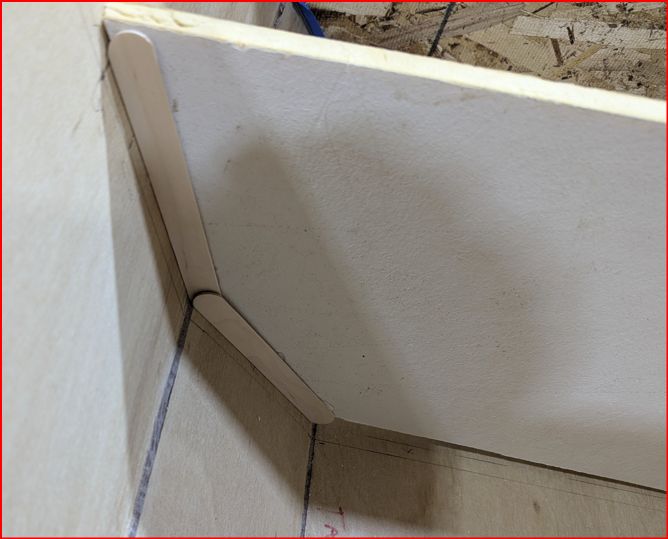
Next step was to final fit into the boat using stir sticks and hot glue to get the final shape. This was finally layed on top of the marine ply to mark and cut the bulkhead for final fitting.
Its funny that they say the build is for beginners and it will take 200 hours. Not sure what that even means, I’m having fun but I’m so far over 200 hours I lost track!!
Tim
-
-
June 22, 2025 at 10:48 am #53158Doug HermannParticipant
Hi Joe – I built the Oonagh from the kit – so I didn’t have to think too much – just follow the directions. If memory serves me – the bulkhead get installed by setting up the midship thwarts – then you measure forward and backwards to position the forward bulkhead (mast step just forward of the bulkhead) and the rear thwart. The top pieces as cut to the plans help you position the bulkheads. If you scroll through my build series you will see the time frame that I cam to installing the interior. I recall dry fitting everything before any epoxy was used. It all came together; everything was square and fitted as designed. I hope this helps. It was a fun build – jump in and enjoy!
-
June 22, 2025 at 8:58 pm #53161Participant
Thank you for the response Doug. Looking at your photos, Margaret Ann is a testament to your thoughtful and meticulous approach, a man after my own heart! The bulkhead locations are easy to find, lack of information pertaining to shape is a problem. It seem once the boat specs were sent to Hewes & Co. for kit fabrocation, it would be short work to provide bulkhead lay-outs after the fact. Might reach out to Doug Hylan to see if that is doable. Thanks again.
-
June 23, 2025 at 7:47 pm #53166Participant
Thank you for the response Tim. Glad to see signs of life on the forum. I thought of enlarging the bulkhead thumb-nails also and trying to come up with an accurate scale. Don’t use cad, I’m old school paper and pencil. Your foam board and stir stick suggestion is a good one. I thought of establishing a horizonital line at the exact locations, measuring down and lofting onto a template. Just seems like an awful lot of additional work for plan builders that didn’t have to be. Spoke with Steve at OCH and got the impression that Doug isn’t offering plan support. Emailed Doug anyway, about including bulkhead temps in plans being Hewes & Co has one information. Kind of not expecting a response. Thanks again. Joe.
-
June 24, 2025 at 1:33 am #53167Participant
Yeah they could have given us 1:1 plot for easy cutting, but they expect you to take an architecture scale and loft that up to full size. Took a coupld of days to come up with the full size patterns using my method, and you are right, it could have been zero time since they already knew the size. It’s as if they wanted to save paper, and cut costs…as if we wouldn’t have paid a little more to get complete plans. I would build a Devlin boat if I were to do this again…his book and plans seem like a good deal to me.
I also contacted Doug via email when I started…it was crickets. My guess is that income from plans is so scant it doesn’t pay for customer support.
But overall building from plans is pretty special, I think you will like the build!
t
-
-
June 24, 2025 at 11:21 am #53173Participant
Agreed. Save pennies or steer builders towards the kit.
-
June 24, 2025 at 12:27 pm #53174Participant
And ….we go back to sleep now…
-
November 19, 2025 at 12:10 pm #54121Participant
Hey website manager, I’m trying to leave pictures of the finished boat but I keep getting this message.
The files are standard 4M jpeg images…so not sure what the problem is.
t
-
-
AuthorPosts
- You must be logged in to reply to this topic.