Home › Forums › 11′ 10″ ARRIBA / OONAGH Dinghy – Official Step-by-Step Boatbuilders’ Forum › ARRIBA / OONAGH – 18 – Oarlock › Oars & Locks
- This topic has 2 replies, 2 voices, and was last updated 5 years ago by
 Roy Jones.
-
AuthorPosts
-
-
July 8, 2021 at 9:49 pm #44030Roy JonesParticipant
I have structurally completed my Oonagh and are now working on the various add-ons I want to incorporate in her.
Here in NZ we can buy ready made oars in various sizes for about NZ$130 pair but I feel they are heavy, clunky and impersonal items that leave me cold. As a result I like to build my own tailored pair for whatever craft I require them for. I find building a pair of bespoke oars is great fun and provides huge satisfaction when they are for myself.
I just use two 8ft lengths of 4 x 2in No 1 grade Clear treated Radiata Pine and glue two pieces of 2 x 2 x 30 inch long on each side at one end of each 8ft length.
This makes two hunks of timber 4 x 2 at one end and 8 x 2 the other. These are the blanks of the pair of oars. I figured to have 8 ft oars for comfortable rowing in Oonagh, but this is personal choice. Once the epoxy glue set I set about cutting them down to size.
It took me about 6 hours to finish them to where I could paint them.
I blanked them out with the bandsaw, both in thickness profile on edge then the shape on the flat. Once this was cut out all rough but square, it was then into the plane and spokeshave to get rid of all the surplus timber.
I have an electric hand planer but doing it slowly by hand minimises any mistakes because I spend quite a bit of time having a rest, visualising and contemplating how they should look when finished.
A final coarse hand-sand locates all the humps and bumps before painting and it is a delight seeing beautiful oars evolve out of rough chunks of timber and displaying your own personality.
The final task is the handgrip. If you haven’t a bench belt sander then seek out a friend who has because they are imperative to produce the correct grip.
I cut the rough shape of the grip with the bandsaw, but it is the end of the belt drum that enables the slight taper and the curve up to the full loom dimension. Rotating the oar as I sand produces the ideal grip. I don’t paint the grip though, it has to be oiled or raw.
One of my idiosyncrasies is I always incorporate a thumb groove at the end of the grip. I often row at night and when I pick up the oar, I can instinctively locate the vertical blade position with my thumb wrapped around the end grip.

I can buy reasonable oars, even second hand, but the satisfaction of making your own is huge and something to be proud of and they are quite simple to build.
-
July 10, 2021 at 8:52 pm #44041
 Doug HermannParticipant
Thank you for posting Roy!
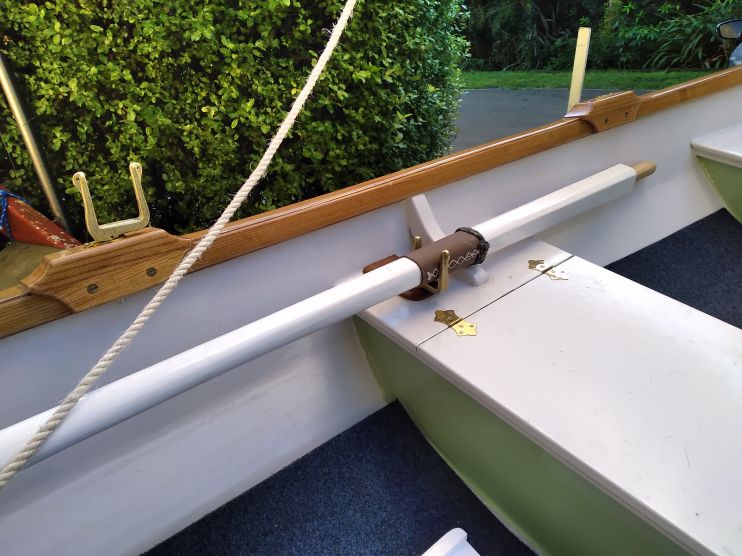
Very well done Roy! The thumb groove is pure genius. If you were just a tad closer, I would send my oars to you for thumb grooves!!! I like the oar cradle as well. Is that made by using an extra oarlock? Is it fitted solid to the base, or is it sitting in a hole for the shaft of the oarlock? Maybe I should ask is it removable? Nice touch! This has me thinking how to secure my oars.
-
July 11, 2021 at 12:37 am #44043Roy JonesParticipant
Hello Doug, nice to hear from you, yes oars lose in the boat are a nuisance and when trailing them on the road they can damage the boat bouncing around, but even when boating I like to have them secured somewhere. I fitted that light pad down onto the middle thwart beside the knee and just drilled a hole same diameter as the oarlock and drop the pair of locks into them. That way the locks and the oars are in secure in one place and stop them getting in the road when using the boat. Re the thumb groove, it is pretty easy to create.. if no drum or belt sander, I would use one of those simple round 1 inch sanding drills that fit into a battery or electric drill. Cheers and you’re doing well with your Oonagh… have you a name for her as yet? cheers, keep in touch.
-
-
AuthorPosts
- You must be logged in to reply to this topic.